
Jet Controller
Instructions

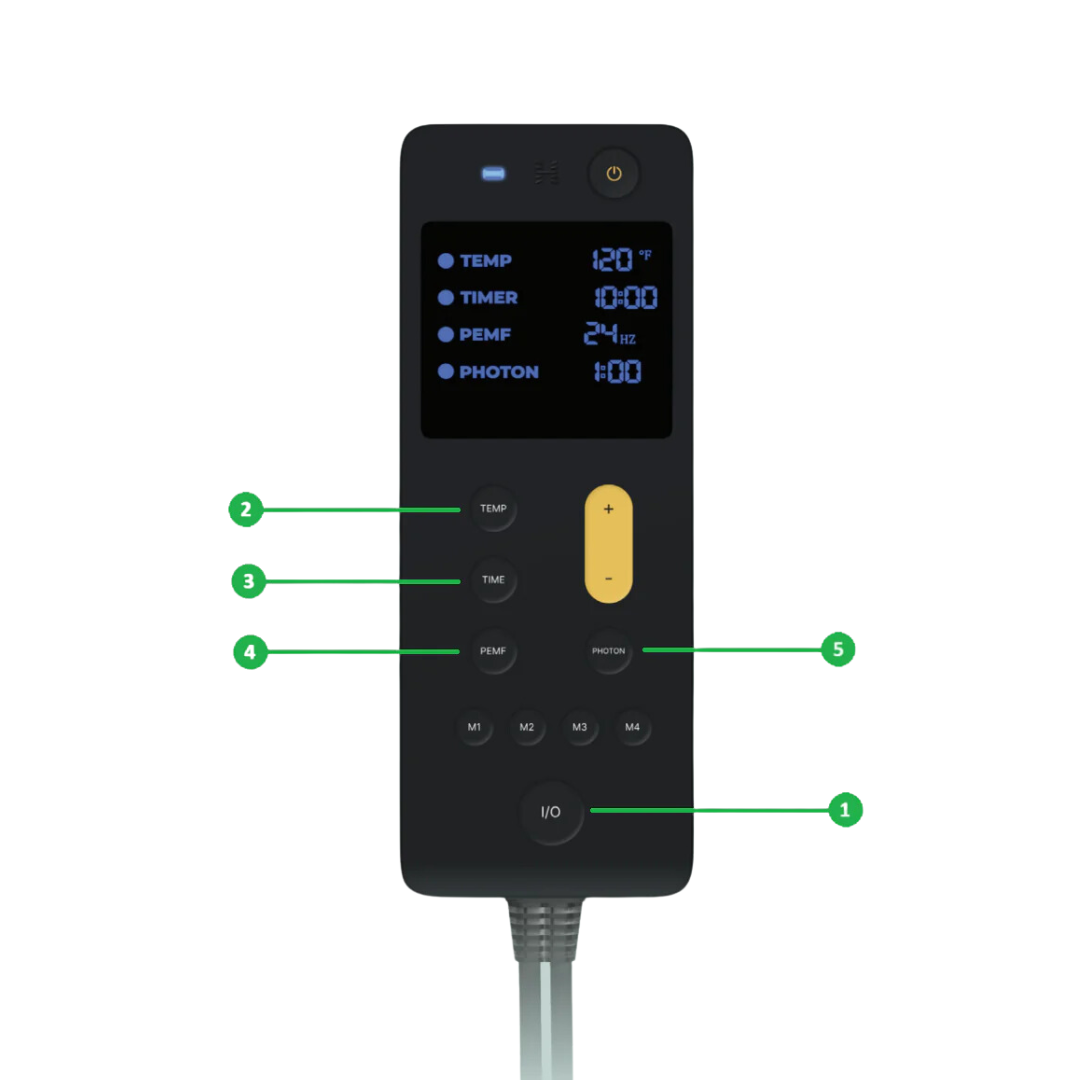
1. POWER
Press the I/O button to power up the controller (the blue indicator will light up).
A second press will power the controller OFF.
Press the Power button to turn the controller ON. Indicators TEMP, TIMER, PEMF, and PHOTON will light up on the screen. A second press will turn the controller OFF.

2. TEMPERATURE Set and Adjust
Press the TEMP button once to activate the heat (timer will be activated simultaneously). Press the TEMP button again to enter temperature adjustment mode (the temperature indicator will start flashing). Set the desired temperature and press the TEMP button again to save the setting.
TEMP -> TEMP -> + or – -> TEMP*

3. TIMER Set and Adjust
Press the TIME button to enter timer adjustment mode (the time indicator will start flashing). Set the desired time (0:01, 0:02, … 0:59, 1:00, 2:00, … 12:00) and press the TIME button again to save the setting. The timer and heat will automatically turn off when the countdown reaches 0:00.
TIME -> + or – -> Time*
4. PEMF Set and Adjust
Press the PEMF button once to activate PEMF. 2nd press activates PEMF frequency adjustment mode (PEMF indicator will start flashing). Set the desired frequency (0.25, 0.5, 1, … 30 Hz) and press the PEMF button again to save the setting. The 3rd press (after the adjustment mode exit due to any button press (including the PEMF button) will deactivate PEMF function.
PEMF -> PEMF -> + or – -> TEMP*
PEMF is set as cycles of 20 min on and 100 min off until PEMF is turned OFF or TIMER countdown reaches 0:00.
5. PHOTON LIGHT Set
Press the PHOTON button to turn the lights ON or OFF (the screen will display the light operating time countdown). Press & hold the TIME button to enter the light operating time adjustment mode (the PHOTON indicator will start flushing). Set the time (1 to 9 hrs), and press the TIME button again to save the setting. The light will automatically turn off when the countdown reaches 0:00.

6. MEMORY MODE
Press the M1 to M4 buttons to activate a memorized mode. The screen will display the selected mode along with the corresponding temperature, time, PEMF, and
photon settings (see page 2 for factory presets).
To adjust settings, follow the instructions provided above. To save new settings press & hold the corresponding M-button for 5 sec (a flashing blue indicator will confirm the successful update).
7. °F or °C Units Set
Press and hold TEMP button for 6 sec to switch between Fahrenheit and Celsius.

8. FACTORY RESET
When the controller is turned ON, press & hold the Power button for 10 sec. The controller will shut down and then turn back ON automatically. For factory settings, please refer to ourPDF instructions.
Information
Please allow up to 40 minutes for the surface to reach the maximum temperature. Once flashing temperature has stopped, the indicator displays the actual temperature measured at the core of the mat. Press and hold + or – button to reach desired numbers faster.
HealthyLine produces almost 100 mat variations with different sizes, power, and functions. We use over a dozen different controllers. If your mat came with a different one, they all work similarly. However, they may not substitute each other even if they fit in the jack. Please DO NOT switch controllers between different mats.
First, please plug your controller deep into the mat’s jack and then into a power outlet. This unit is under warranty. If anything happens just send us an email to info@HealthyLine.com with a picture of the controller and detailed information about the concern.
Remember, the mat is made of many functional layers. It takes 5-to-25 minutes for the stones to heat up completely. Keep the mat covered with a blanket and/or lie on the mat to make it heat up faster.